1. Giới thiệu
int* first (int* x)
{
(*x++);
return x; // SAFE, x is outside this scope
}
int& second (int& x)
{
x++;
return x; // SAFE, x is outside this scope
}
int& third ()
{
int q;
return q; // ERROR, scope of q ends here
}
int& fourth ()
{
static int x;
return x; // SAFE, x is static, hence lives till the end.
}
int main()
{
int a=0;
first(&a); // UGLY and explicit
second(a); // CLEAN and hidden
}
We have four different functions in the above program.
first() takes a pointer as argument and returns a pointer, it will work fine. The returning pointer points to variable declared outside first(), hence it will be valid even after the first() ends.
Similarly, second() will also work fine. The returning reference is connected to valid storage, that is int a in this case.
But in case of third(), we declare a variable q inside the function and try to return a reference connected to it. But as soon as function third() ends, the local variable q is destroyed, hence nothing is returned.
To remedify above problem, we make x as static in function fourth(), giving it a lifetime till main() ends, hence now a reference connected to x will be valid when returned.
2. Const Reference
Sử dụng làm tham chiếu cho hàm tránh việc bị thay đổi giá trị tham số.
Ví dụ
void g(const int& x)
{
x++;
} // ERROR
int main()
{
int i=10;
g(i);
}
Chúng ta không thể thay đổi đối số trong hàm vì nó đã được truyền như 1 hằng tham chiếu.
Khi ta sử dụng const reference,chỉ 1 địa chỉ được truyền vào trên stack,cái được sử dụng bên
trong hàm và hàm không thể thay đổi đối số vì nó là 1 hằng.
3. mutable Keyword
mutable keyword is used with member variables of class, which we want to change even if the object is of const type. Hence, mutable data members of a const objects can be modified.
class Zee
{
int i;
mutable int j;
public:
Zee()
{
i = 0;
j = 0;
}
void fool() const
{
i++; // will give error
j++; // works, because j is mutable
}
};
int main()
{
const Zee obj;
obj.fool();
}
Hiển thị các bài đăng có nhãn C. Hiển thị tất cả bài đăng
Hiển thị các bài đăng có nhãn C. Hiển thị tất cả bài đăng
Thứ Ba, 2 tháng 4, 2019

[Học C++] Bài8 - Inline Functions và Function Overloading trong C++
Inline function là gì?
Nó có tính chất khá tương tự như Preprocessors trong C.
Hàm Inline thực chất là 1 hàm,.nó là bản copy của hàm trong quá trình biên dịch...
Tất cả các members bên trong class được mặc định định nghĩa như 1 Inline.Do đó không cần khai báo
từ khóa Inline,nhưng để cho clear chúng ta có thể thêm...
inline void fun(int a)
{
return a++;
}
1 . Forward References trong C++
Vì Inline function trong 1 class được đánh giá đến khi kết thúc class "};"
Ví dụ sau sẽ rõ:
class ForwardReference
{
int i;
public:
// call to undeclared function
int f() //f là 1 inline function
{
return g()+10;
}
int g() //g là 1 inline function
{
return i;
}
};
int main()
{
ForwardReference fr;
fr.f();
}
Nhiều bạn nghĩ program sẽ lỗi...Nhưng không hề lỗi.
Hàm Inline trong class: Các hàm định nghĩa ở trên có thể gọi các hàm ở line dưới.
Vì class chỉ được định nghĩa khi nó kết thúc khỏi dấu "};" Do đó tất cả các hàm trong
class đều được định nghĩa.
Kinh nghiệm:
- Tạo hàm Inline nhỏ và có ít tham số sẽ tốt hơn.
- Inline function sẽ tăng tính hiệu quả,nhưng không nên tạo tất cả là hàm Inline.
Vì khi có quá nhiều hàm Inline nó dẫn đến code bloat,Cache missing và ảnh hưởng tới speed.
- Lời khuyên là: Nên định nghĩa các hàm lớn bên ngoài class,sử dụng "::" để gọi.
- Inline function không yêu cầu cấp bộ nhớ cho nó mà nó được giữ tại Symbol table..Do đó
khi ta thực hiện tác vụ là yêu cầu địa chỉ của Inline function,Compiler không thể thực hiện
quá trình inlining như 1 hàm binhg thường.Bởi vì,để cung cấp địa chỉ cho 1 hàm bất kì,Compiler sẽ phải
cấp phát bộ nhớ cho nó.
Nếu class có nhiều hàm và các hàm trùng tên nhau..
Chú ý,Overloading không phải đệ quy--- Đệ quy là 1 hàm và trong thân hàm gọi lại chính nó...
Còn Overloading là các hàm với các kiểu trả về,tham số khác nhau,hay đặc biệt là giống nhau nhưng cùng tên.
2. Có 2 cách tạo Overloading function
2.1 Khác số lượng tham số
// first definition có 2 tham số x,y
int sum (int x, int y)
{
cout << x+y;
}
// second overloaded defintion có 3 tham số x,y,z
int sum(int x, int y, int z)
{
cout << x+y+z;
}
int main()
{
// sum() with 2 parameter will be called
sum (10, 20);
//sum() with 3 parameter will be called
sum(10, 20, 30);
}
2.2 Khác kiểu trả về
int sum(int x, int y)
{
cout<< x+y;
}
// second overloaded defintion
double sum(double x, double y)
{
cout << x+y;
}
int main()
{
sum (10,20);
sum(10.5,20.5);
}
2.3 Hàm với tham số mặc định
sum(int x, int y=0)
{
cout << x+y;
}
int main()
{
sum(10);
sum(10,0);
sum(10,10);
}
OUTPUT 10 10 20
Một số rule:
- Chỉ tham số cuối cùng mới được làm default argument
sum (int x,int y);
sum (int x,int y=0);
sum (int x=0,int y); // This is Incorrect
void f(int a,int b=0,int c) {} //sai
Vậy muốn dùng nhiều default parameters???
void f(int a,int b=0,int c=0) {} // Để dùng default thì ra phải set value cho
tất cả các tham số sau tham số đầu tiên.
Ngoài ta,ta cũng có thể không cần khai báo tham số mà chỉ cần khai báo kiểu dữ liệu
void sum (int, int);
void sum (int, int=0);
void main() {
sum(8,8); //ok
sum(7.6,9); // vẫn ok. Nhưng hãy cẩn thận đến range của đối số,có thể kết quả sẽ sai
}
Nó có tính chất khá tương tự như Preprocessors trong C.
Hàm Inline thực chất là 1 hàm,.nó là bản copy của hàm trong quá trình biên dịch...
Tất cả các members bên trong class được mặc định định nghĩa như 1 Inline.Do đó không cần khai báo
từ khóa Inline,nhưng để cho clear chúng ta có thể thêm...
inline void fun(int a)
{
return a++;
}
1 . Forward References trong C++
Vì Inline function trong 1 class được đánh giá đến khi kết thúc class "};"
Ví dụ sau sẽ rõ:
class ForwardReference
{
int i;
public:
// call to undeclared function
int f() //f là 1 inline function
{
return g()+10;
}
int g() //g là 1 inline function
{
return i;
}
};
int main()
{
ForwardReference fr;
fr.f();
}
Nhiều bạn nghĩ program sẽ lỗi...Nhưng không hề lỗi.
Hàm Inline trong class: Các hàm định nghĩa ở trên có thể gọi các hàm ở line dưới.
Vì class chỉ được định nghĩa khi nó kết thúc khỏi dấu "};" Do đó tất cả các hàm trong
class đều được định nghĩa.
Kinh nghiệm:
- Tạo hàm Inline nhỏ và có ít tham số sẽ tốt hơn.
- Inline function sẽ tăng tính hiệu quả,nhưng không nên tạo tất cả là hàm Inline.
Vì khi có quá nhiều hàm Inline nó dẫn đến code bloat,Cache missing và ảnh hưởng tới speed.
- Lời khuyên là: Nên định nghĩa các hàm lớn bên ngoài class,sử dụng "::" để gọi.
- Inline function không yêu cầu cấp bộ nhớ cho nó mà nó được giữ tại Symbol table..Do đó
khi ta thực hiện tác vụ là yêu cầu địa chỉ của Inline function,Compiler không thể thực hiện
quá trình inlining như 1 hàm binhg thường.Bởi vì,để cung cấp địa chỉ cho 1 hàm bất kì,Compiler sẽ phải
cấp phát bộ nhớ cho nó.
Nếu class có nhiều hàm và các hàm trùng tên nhau..
Chú ý,Overloading không phải đệ quy--- Đệ quy là 1 hàm và trong thân hàm gọi lại chính nó...
Còn Overloading là các hàm với các kiểu trả về,tham số khác nhau,hay đặc biệt là giống nhau nhưng cùng tên.
2. Có 2 cách tạo Overloading function
2.1 Khác số lượng tham số
// first definition có 2 tham số x,y
int sum (int x, int y)
{
cout << x+y;
}
// second overloaded defintion có 3 tham số x,y,z
int sum(int x, int y, int z)
{
cout << x+y+z;
}
int main()
{
// sum() with 2 parameter will be called
sum (10, 20);
//sum() with 3 parameter will be called
sum(10, 20, 30);
}
2.2 Khác kiểu trả về
int sum(int x, int y)
{
cout<< x+y;
}
// second overloaded defintion
double sum(double x, double y)
{
cout << x+y;
}
int main()
{
sum (10,20);
sum(10.5,20.5);
}
2.3 Hàm với tham số mặc định
sum(int x, int y=0)
{
cout << x+y;
}
int main()
{
sum(10);
sum(10,0);
sum(10,10);
}
OUTPUT 10 10 20
Một số rule:
- Chỉ tham số cuối cùng mới được làm default argument
sum (int x,int y);
sum (int x,int y=0);
sum (int x=0,int y); // This is Incorrect
void f(int a,int b=0,int c) {} //sai
Vậy muốn dùng nhiều default parameters???
void f(int a,int b=0,int c=0) {} // Để dùng default thì ra phải set value cho
tất cả các tham số sau tham số đầu tiên.
Ngoài ta,ta cũng có thể không cần khai báo tham số mà chỉ cần khai báo kiểu dữ liệu
void sum (int, int);
void sum (int, int=0);
void main() {
sum(8,8); //ok
sum(7.6,9); // vẫn ok. Nhưng hãy cẩn thận đến range của đối số,có thể kết quả sẽ sai
}
Thứ Hai, 1 tháng 4, 2019
[Học C++] Bài8 - Lớp lưu trữ trong C++
Lớp lưu trữ (Storage Class) định nghĩa phạm vi và vòng đời của biến và/hoặc các hàm bên trong một chương trình C/C++. Chúng thường đứng trước kiểu dữ liệu mà chúng tác động. Dưới đây là các lớp lưu trữ có thể được sử dụng trong C/C++:
auto
register
static
extern
mutable
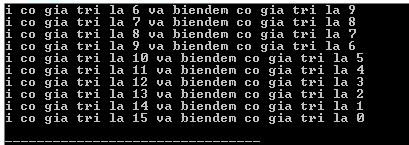
3 . Lớp lưu trữ static trong C/C++
Lớp lưu trữ static trong C/C++ nói với compiler để giữ một biến cục bộ tồn tại trong toàn bộ thời gian sống của chương trình thay vì tạo và hủy biến mỗi lần nó vào và ra khỏi phạm vi biến. Vì vậy, các biến có static cho phép nó duy trì giá trị giữa các lần gọi hàm.
Lớp lưu trữ static cũng có thể được áp dụng cho các biến toàn cục (global). Khi áp dụng cho biến toàn cục, nó nói với trình biên dịch rằng, phạm vi của biến toàn cục bị giới hạn trong tập tin mà nó được khai báo.
Trong C/C++, khi static được sử dụng trên thành viên dữ liệu của lớp, nó gây ra: chỉ có một bản sao của thành viên đó được chia sẻ bởi tất cả đối tượng trong lớp của nó.
#include <iostream>
// phan khai bao ham
void func(void);
static int biendem = 10; /* Day la bien toan cuc */
main()
{
while(biendem--)
{
func();
}
return 0;
}
// Phan dinh nghia ham
void func( void )
{
static int i = 5; // Day la bien cuc bo dang static
i++;
std::cout << "i co gia tri la " << i ;
std::cout << " va biendem co gia tri la " << biendem << std::endl;
}
auto
register
static
extern
mutable
3 . Lớp lưu trữ static trong C/C++
Lớp lưu trữ static trong C/C++ nói với compiler để giữ một biến cục bộ tồn tại trong toàn bộ thời gian sống của chương trình thay vì tạo và hủy biến mỗi lần nó vào và ra khỏi phạm vi biến. Vì vậy, các biến có static cho phép nó duy trì giá trị giữa các lần gọi hàm.
Lớp lưu trữ static cũng có thể được áp dụng cho các biến toàn cục (global). Khi áp dụng cho biến toàn cục, nó nói với trình biên dịch rằng, phạm vi của biến toàn cục bị giới hạn trong tập tin mà nó được khai báo.
Trong C/C++, khi static được sử dụng trên thành viên dữ liệu của lớp, nó gây ra: chỉ có một bản sao của thành viên đó được chia sẻ bởi tất cả đối tượng trong lớp của nó.
#include <iostream>
// phan khai bao ham
void func(void);
static int biendem = 10; /* Day la bien toan cuc */
main()
{
while(biendem--)
{
func();
}
return 0;
}
// Phan dinh nghia ham
void func( void )
{
static int i = 5; // Day la bien cuc bo dang static
i++;
std::cout << "i co gia tri la " << i ;
std::cout << " va biendem co gia tri la " << biendem << std::endl;
}
Code C hay sử dụng trong lập trình nhúng - Embedded C
1. include và preprocessor
2. Macro và biến
. Qualifier trong C
Qualifier cung cấp thông tin bổ sung về các biến theo sau nó.
- const : Đối tượng của kiểu const không thể bị thay đổi bởi chương trình trong khi thực thi
- volatile: Modifier này nói cho compiler rằng giá trị của biến có thể được thay đổi một cách không rõ ràng (không báo trước) bởi chương trình.
3. Struct
Struct được sử dụng rất nhiều trong lập trình nhúng.
Ví dụ như khai báo 2 kiểu trạng thái 0,1
struct State {
bool GPIO_SET 1;
bool GPIO_RESET 0;
}sts;
4. Hàm
- Hàm quan trọng nhất trong lập trình nhúng:
while(1) {
// các hàm trong này luôn được lặp mãi mãi,cho đến khi chương trình dừng hẳn thì thôi
}
while(0) {
// Không thực thi bất kì câu lệnh nào trong này.
}
5. Con trỏ
6. Các từ khóa và kiểu dữ liệu
2. Macro và biến
. Qualifier trong C
Qualifier cung cấp thông tin bổ sung về các biến theo sau nó.
- const : Đối tượng của kiểu const không thể bị thay đổi bởi chương trình trong khi thực thi
- volatile: Modifier này nói cho compiler rằng giá trị của biến có thể được thay đổi một cách không rõ ràng (không báo trước) bởi chương trình.
3. Struct
Struct được sử dụng rất nhiều trong lập trình nhúng.
Ví dụ như khai báo 2 kiểu trạng thái 0,1
struct State {
bool GPIO_SET 1;
bool GPIO_RESET 0;
}sts;
4. Hàm
- Hàm quan trọng nhất trong lập trình nhúng:
while(1) {
// các hàm trong này luôn được lặp mãi mãi,cho đến khi chương trình dừng hẳn thì thôi
}
while(0) {
// Không thực thi bất kì câu lệnh nào trong này.
}
5. Con trỏ
6. Các từ khóa và kiểu dữ liệu
Chủ Nhật, 31 tháng 3, 2019
[Học C++] Bài6 - Hàm và các keyword trong C++ (static,)
1. Các hàm thành viên trong Class
- Simple functions
- Static functions
- Const functions
- Inline functions
- Friend functions
1.1 Hàm đơn giản
Khai báo giống như 1 hàm bình thường.
[Kiểu trả về] [tên hàm] (tham số)
{
//thân hàm
}
vi du:
void Neb {
cout<<" Neb is handsome!";
}
1.2 Static function
1.5 Friend function
Friend function không phải là một thành viên của class. Như đã biết các class,hàm bên ngoài
không thể truy cập vào thành viên private... Do đó friend function được ra đời.
Mục đích là để giúp truy cập vào đối tượng private.
Ta có thể định nghĩa 1 hàm gobal như friend hay 1 thàm thành viên của class khác là friend.
Ví dụ
class WithFriend
{
int i;
public:
friend void fun(); // global function as friend
};
void fun()
{
WithFriend wf;
wf.i=10; // access to private data member
cout << wf.i;
}
int main()
{
fun(); //Can be called directly
}
--- Cách 2
Khi cấu hình 1 class là friend thì tất cả các hàm thành viên sẽ tự động trở thành hàm bạn...
class Other
{
void fun();
};
class WithFriend
{
private:
int i;
public:
void getdata(); // Member function of class WithFriend
// making function of class Other as friend here
friend void Other::fun();
// making the complete class as friend
friend class Other;
};
2. Static Keyword
2.1 Static function
class COGE {
private:
int x; //data member
public:
int y;
static void fun() {
//x = 1; //error
y = 1;
cout<<"Neb";
}
void f() {
//x = 1; //error,khong thể
y = 1;
}
};
int _tmain(int argc, _TCHAR* argv[])
{
//void COGE::f(); //error,may not define outside of class
COGE::fun();
COGE obj1;
COGE obj2.
cout<<obj1.fun();
cout<<obj2.fun();
system("pause");
return 0;
}
Cả 2 objects đều dùng chung 1 hàm fun() => Dùng static để đỡ phải khai báo 2 hàm.
Chú ý: Hàm static không thể truy cập vào data members và member function.
Chỉ có static data hoặc static function thôi.
2.2 Static data member
- Chia sẻ với tất cả các đối tượng.Và nó chỉ được lưu trữ 1 lần,do đó nó không hề copy riêng biệt cho mỗi đối tượng như
các biến thông thường.
- Biến static member (data members) không được khởi tạo bằng Constructor,bởi vì không có sự khởi tạo đối tượng.
- Nó có thể được khởi tạo giá trị bên ngoài class. Nếu không khởi tạo Linker sẽ báo lỗi.
- Một khi đã định nghĩa giá trị cho biến static,sau đó ra không thể khởi tạo lại giá trị cho biến nữa.
Vậy khi nào cần sử dụng?
Khi mà tất cả các đối tượng đều truy cập chung vào 1 biến . Thì ta nên sử dụng static.
Nếu không dùng static,thì mỗi đối tượng sẽ gọi 1 lần hàm COnstructor => Lãng phí hơn so với gọi 1 biến tĩnh.
Ví dụ:
class X
{
public:
static int i;
X()
{
// construtor
};
};
int X::i=1;
int main()
{
X obj;
cout << obj.i; // in ra 10
}
2.3 Static Class Object
- Static objects cũng được khởi tạo bằng Constructor như các Objects bình thường.
- Lifetime của static Object là khi kết thúc chương trình. Ví dụ dưới sec chứng minh rằng hàm Destructor
không được gọi khi ra khỏi if{} và đến tận lúc kết thúc chương trình...
Ví dụ:
class Abc
{
int i;
public:
Abc()
{
i=0;
cout << "constructor";
}
~Abc()
{
cout << "destructor";
}
};
void f()
{
static Abc obj;
}
int main()
{
int x=0;
if(x==0)
{
f();
}
cout << "END";
}// gọi hàm hủy ở đây
OUTPUT
constructor END destructor
- Simple functions
- Static functions
- Const functions
- Inline functions
- Friend functions
1.1 Hàm đơn giản
Khai báo giống như 1 hàm bình thường.
[Kiểu trả về] [tên hàm] (tham số)
{
//thân hàm
}
vi du:
void Neb {
cout<<" Neb is handsome!";
}
1.2 Static function
1.5 Friend function
Friend function không phải là một thành viên của class. Như đã biết các class,hàm bên ngoài
không thể truy cập vào thành viên private... Do đó friend function được ra đời.
Mục đích là để giúp truy cập vào đối tượng private.
Ta có thể định nghĩa 1 hàm gobal như friend hay 1 thàm thành viên của class khác là friend.
Ví dụ
class WithFriend
{
int i;
public:
friend void fun(); // global function as friend
};
void fun()
{
WithFriend wf;
wf.i=10; // access to private data member
cout << wf.i;
}
int main()
{
fun(); //Can be called directly
}
--- Cách 2
Khi cấu hình 1 class là friend thì tất cả các hàm thành viên sẽ tự động trở thành hàm bạn...
class Other
{
void fun();
};
class WithFriend
{
private:
int i;
public:
void getdata(); // Member function of class WithFriend
// making function of class Other as friend here
friend void Other::fun();
// making the complete class as friend
friend class Other;
};
2. Static Keyword
2.1 Static function
class COGE {
private:
int x; //data member
public:
int y;
static void fun() {
//x = 1; //error
y = 1;
cout<<"Neb";
}
void f() {
//x = 1; //error,khong thể
y = 1;
}
};
int _tmain(int argc, _TCHAR* argv[])
{
//void COGE::f(); //error,may not define outside of class
COGE::fun();
COGE obj1;
COGE obj2.
cout<<obj1.fun();
cout<<obj2.fun();
system("pause");
return 0;
}
Cả 2 objects đều dùng chung 1 hàm fun() => Dùng static để đỡ phải khai báo 2 hàm.
Chú ý: Hàm static không thể truy cập vào data members và member function.
Chỉ có static data hoặc static function thôi.
2.2 Static data member
- Chia sẻ với tất cả các đối tượng.Và nó chỉ được lưu trữ 1 lần,do đó nó không hề copy riêng biệt cho mỗi đối tượng như
các biến thông thường.
- Biến static member (data members) không được khởi tạo bằng Constructor,bởi vì không có sự khởi tạo đối tượng.
- Nó có thể được khởi tạo giá trị bên ngoài class. Nếu không khởi tạo Linker sẽ báo lỗi.
- Một khi đã định nghĩa giá trị cho biến static,sau đó ra không thể khởi tạo lại giá trị cho biến nữa.
Vậy khi nào cần sử dụng?
Khi mà tất cả các đối tượng đều truy cập chung vào 1 biến . Thì ta nên sử dụng static.
Nếu không dùng static,thì mỗi đối tượng sẽ gọi 1 lần hàm COnstructor => Lãng phí hơn so với gọi 1 biến tĩnh.
Ví dụ:
class X
{
public:
static int i;
X()
{
// construtor
};
};
int X::i=1;
int main()
{
X obj;
cout << obj.i; // in ra 10
}
2.3 Static Class Object
- Static objects cũng được khởi tạo bằng Constructor như các Objects bình thường.
- Lifetime của static Object là khi kết thúc chương trình. Ví dụ dưới sec chứng minh rằng hàm Destructor
không được gọi khi ra khỏi if{} và đến tận lúc kết thúc chương trình...
Ví dụ:
class Abc
{
int i;
public:
Abc()
{
i=0;
cout << "constructor";
}
~Abc()
{
cout << "destructor";
}
};
void f()
{
static Abc obj;
}
int main()
{
int x=0;
if(x==0)
{
f();
}
cout << "END";
}// gọi hàm hủy ở đây
OUTPUT
constructor END destructor
[Học C++] Bài7- Hàm tạo(Constructor),Hàm hủy (Destructor) trong C++
Hàm tạo là 1 hàm đặc biệt,thực hiện khởi tạo cho mỗi đối tượng.Compiler sẽ gọi hàm tạo bất cứ
khi nào 1 đối tượng được tạo...Hàm tạo khởi tạo giá trị cho đối tượng sau khi lưu trữ và cấp phát cho đối tượng.
Trong khi đó,hàm hủy được sử dụng để giải phóng tài nguyên của đối tượng đã được tạo trước đó.
1. Constructor - Hàm tạo
Có 3 loại hàm tạo
- Default Constructor
- Parametrized Constructor (Hàm tạo tham số)
- Copy COnstructor
Cú pháp : [Tên class](các tham số nếu có) {}
class A
{
public:
int i;
A(); // constructor declared
};
// constructor definition
A::A()
{
i = 1;
}
1.1 Hàm tạo mặc định
Là hàm tạo không có tham số...
Nếu trong class không có hàm tạo nào..Compiler sẽ gọi ra 1 hàm tạo mặc định.
Còn khi bạn khai báo 1 hàm tạo trong class rồi thì Compiler sẽ không tự cung cấp hàm tạo mặc định.
class Cube
{
public:
int side;
Cube()
{
side = 10;
}
};
int main()
{
Cube c;
cout << c.side;
}
1.2 Hàm tạo tham số
class Cube
{
public:
int side;
Cube(int x)
{
side=x;
}
};
int main()
{
Cube c1(10);
Cube c2(20);
Cube c3(30);
cout << c1.side;
cout << c2.side;
cout << c3.side;
}
1.3. Constructor Overloading
Giống như hàm bình thường,.. Hàm tạo cũng có thể bị overloading..
Khi chúng ta có cả default và parametrized constructors được định nghĩa trong class thì ta sẽ có Overloading COnstructor.
Ví dụ:
#include "stdafx.h"
#include <iostream>
#include <string>
using namespace std;
class COGE{
public:
int id;
string name;
// first constructor
COGE(int x) {
id = x;
name = "None";
}
// second constructor
COGE(int x,string str){
id = x;
name = str;
}
};
int _tmain(int argc, _TCHAR* argv[])
{
COGE nhanvien1(1);
COGE nhanvien2(2,"Neb");
//COGE nhanvien3; //Error vì không có hàm tạo nào không có tham số
system("pause");
return 0;
}
2 Hàm tạo copy
Bản chất là copy các đối tượng đã được khởi tạo từ 1 hàm tạo có sẵn..
Cú pháp
Classname(const classname & objectname)
{
//
}

Vi du 2:
#include <iostream>
using namespace std;
class COGE {
public:
int x,y;
COGE(int a,int b) {
x = a;
y = b;
}
// ham tao copy
COGE(const COGE &Neb) {
x = Neb.x;
y = Neb.y;
}
~COGE() {}
};
int _tmain(int argc, _TCHAR* argv[])
{
COGE object1(1,2);
cout<<object1.x; //in ra 1
//
COGE object2(object1);
cout<<object2.x; //in ra 1
//
object1.x = 5;
cout<<object1.x; //in ra 5
cout<<object2.x; //in ra 1
system("pause");
return 0;
}
Nhận xét: Khi thay đổi giá trị của đối tượng này thì không ảnh hưởng đến đối tượng kia.
Vậy, làm sao để khi thay đổi 1 đối tượng thì các đối tượng khác thay đổi theo? Sử dụng phương pháp sau… Ahihi
2.1 Shallow Copy Constructor
Các đối tượng tạo ra sẽ trỏ vào 1 cùng 1 vùng nhớ...

Ví dụ
#include<iostream>
#include<cstring>
using namespace std;
class CopyConstructor
{
char *s_copy;
public:
CopyConstructor(const char *str)
{
s_copy = new char[16]; //Dynamic memory allocation
strcpy(s_copy, str);
}
/* concatenate method */
void concatenate(const char *str)
{
strcat(s_copy, str); //Concatenating 2 strings
}
/* copy constructor */
~CopyConstructor ()
{
delete [] s_copy;
}
void display()
{
cout<<s_copy<<endl;
}
};
/* main function */
int main()
{
CopyConstructor c1("Copy");
CopyConstructor c2 = c1; //Copy constructor
c1.display();
c2.display();
c1.concatenate("Constructor"); //c1 goi concatenate()
c1.display();
c2.display();
return 0;
}
2.2 Deep Copy Constructor
Vậy khi ta muốn: Thay đổi đối tượng này sẽ không ảnh hưởng đến đ tượng kia?
Phương pháp Deep copy sẽ giúp ta giải quyết vấn đề,,,
Tương tự như ví dụ đầu tiên dùng cú pháp : tên class(const tên_class & tên_Object) {}
#include<iostream>
#include<cstring>
using namespace std;
class CopyConstructor
{
char *s_copy;
public:
CopyConstructor (const char *str)
{
s_copy = new char[16]; //Dynamic memory alocation
strcpy(s_copy, str);
}
CopyConstructor (const CopyConstructor &str)
{
s_copy = new char[16]; //Dynamic memory alocation
strcpy(s_copy, str.s_copy);
}
void concatenate(const char *str)
{
strcat(s_copy, str); //Concatenating two strings
}
~CopyConstructor()
{
delete [] s_copy;
}
void display()
{
cout<<s_copy<<endl;
}
};
/* main function */
int main()
{
CopyConstructor c1("Copy");
CopyConstructor c2 = c1; //copy constructor
c1.display();
c2.display();
c1.concatenate("Constructor"); //c1 is invoking concatenate()
c1.display();
c2.display();
return 0;
}
3. Hàm hủy
Cú pháp: ~[Tên class]
Hàm hủy không có tham số truyền vào.
Ví dụ:
class A
{
public:
// defining destructor for class
~A()
{
// statement
}
};
Ví dụ
class A
{
// constructor
A()
{
cout << "Constructor called";
}
// destructor
~A()
{
cout << "Destructor called";
}
};
int main()
{
A obj1; // Constructor Called
int x = 1
if(x)
{
A obj2; // Constructor Called
} // Destructor Called for obj2
} // Destructor called for obj1
Vi du 2:
class Dual
{
public:
int a;
Dual(int x=0)
{
a = x;
}
};
int main()
{
Dual obj1;
Dual obj2(10);
}
khi nào 1 đối tượng được tạo...Hàm tạo khởi tạo giá trị cho đối tượng sau khi lưu trữ và cấp phát cho đối tượng.
Trong khi đó,hàm hủy được sử dụng để giải phóng tài nguyên của đối tượng đã được tạo trước đó.
1. Constructor - Hàm tạo
Có 3 loại hàm tạo
- Default Constructor
- Parametrized Constructor (Hàm tạo tham số)
- Copy COnstructor
Cú pháp : [Tên class](các tham số nếu có) {}
class A
{
public:
int i;
A(); // constructor declared
};
// constructor definition
A::A()
{
i = 1;
}
1.1 Hàm tạo mặc định
Là hàm tạo không có tham số...
Nếu trong class không có hàm tạo nào..Compiler sẽ gọi ra 1 hàm tạo mặc định.
Còn khi bạn khai báo 1 hàm tạo trong class rồi thì Compiler sẽ không tự cung cấp hàm tạo mặc định.
class Cube
{
public:
int side;
Cube()
{
side = 10;
}
};
int main()
{
Cube c;
cout << c.side;
}
1.2 Hàm tạo tham số
class Cube
{
public:
int side;
Cube(int x)
{
side=x;
}
};
int main()
{
Cube c1(10);
Cube c2(20);
Cube c3(30);
cout << c1.side;
cout << c2.side;
cout << c3.side;
}
1.3. Constructor Overloading
Giống như hàm bình thường,.. Hàm tạo cũng có thể bị overloading..
Khi chúng ta có cả default và parametrized constructors được định nghĩa trong class thì ta sẽ có Overloading COnstructor.
Ví dụ:
#include "stdafx.h"
#include <iostream>
#include <string>
using namespace std;
class COGE{
public:
int id;
string name;
// first constructor
COGE(int x) {
id = x;
name = "None";
}
// second constructor
COGE(int x,string str){
id = x;
name = str;
}
};
int _tmain(int argc, _TCHAR* argv[])
{
COGE nhanvien1(1);
COGE nhanvien2(2,"Neb");
//COGE nhanvien3; //Error vì không có hàm tạo nào không có tham số
system("pause");
return 0;
}
2 Hàm tạo copy
Bản chất là copy các đối tượng đã được khởi tạo từ 1 hàm tạo có sẵn..
Cú pháp
Classname(const classname & objectname)
{
//
}

Ví dụ:
#include<iostream>
using namespace std;
class Samplecopyconstructor
{
private:
int x, y; //data members
public:
Samplecopyconstructor(int x1, int y1)
{
x = x1;
y = y1;
}
/* Copy constructor */
Samplecopyconstructor (const Samplecopyconstructor &sam)
{
x = sam.x;
y = sam.y;
}
void display()
{
cout<<x<<" "<<y<<endl;
}
};
/* main function */
int main()
{
Samplecopyconstructor obj1(10, 15); // Normal constructor
Samplecopyconstructor obj2 = obj1; // Copy constructor
cout<<"Normal constructor : ";
obj1.display();
cout<<"Copy constructor : ";
obj2.display();
return 0;
}
using namespace std;
class Samplecopyconstructor
{
private:
int x, y; //data members
public:
Samplecopyconstructor(int x1, int y1)
{
x = x1;
y = y1;
}
/* Copy constructor */
Samplecopyconstructor (const Samplecopyconstructor &sam)
{
x = sam.x;
y = sam.y;
}
void display()
{
cout<<x<<" "<<y<<endl;
}
};
/* main function */
int main()
{
Samplecopyconstructor obj1(10, 15); // Normal constructor
Samplecopyconstructor obj2 = obj1; // Copy constructor
cout<<"Normal constructor : ";
obj1.display();
cout<<"Copy constructor : ";
obj2.display();
return 0;
}
OUTPUT
Normal constructor :10 15
Copy constructor : 10 15
Normal constructor :10 15
Copy constructor : 10 15
Vi du 2:
#include <iostream>
using namespace std;
class COGE {
public:
int x,y;
COGE(int a,int b) {
x = a;
y = b;
}
// ham tao copy
COGE(const COGE &Neb) {
x = Neb.x;
y = Neb.y;
}
~COGE() {}
};
int _tmain(int argc, _TCHAR* argv[])
{
COGE object1(1,2);
cout<<object1.x; //in ra 1
//
COGE object2(object1);
cout<<object2.x; //in ra 1
//
object1.x = 5;
cout<<object1.x; //in ra 5
cout<<object2.x; //in ra 1
system("pause");
return 0;
}
Nhận xét: Khi thay đổi giá trị của đối tượng này thì không ảnh hưởng đến đối tượng kia.
Vậy, làm sao để khi thay đổi 1 đối tượng thì các đối tượng khác thay đổi theo? Sử dụng phương pháp sau… Ahihi
2.1 Shallow Copy Constructor
Các đối tượng tạo ra sẽ trỏ vào 1 cùng 1 vùng nhớ...
Do đó khi 1 đối tượng thay đổi,các đối tượng khác cũng thay đổi theo.
Ví dụ
#include<iostream>
#include<cstring>
using namespace std;
class CopyConstructor
{
char *s_copy;
public:
CopyConstructor(const char *str)
{
s_copy = new char[16]; //Dynamic memory allocation
strcpy(s_copy, str);
}
/* concatenate method */
void concatenate(const char *str)
{
strcat(s_copy, str); //Concatenating 2 strings
}
/* copy constructor */
~CopyConstructor ()
{
delete [] s_copy;
}
void display()
{
cout<<s_copy<<endl;
}
};
/* main function */
int main()
{
CopyConstructor c1("Copy");
CopyConstructor c2 = c1; //Copy constructor
c1.display();
c2.display();
c1.concatenate("Constructor"); //c1 goi concatenate()
c1.display();
c2.display();
return 0;
}
2.2 Deep Copy Constructor
Vậy khi ta muốn: Thay đổi đối tượng này sẽ không ảnh hưởng đến đ tượng kia?
Phương pháp Deep copy sẽ giúp ta giải quyết vấn đề,,,
Tương tự như ví dụ đầu tiên dùng cú pháp : tên class(const tên_class & tên_Object) {}
#include<iostream>
#include<cstring>
using namespace std;
class CopyConstructor
{
char *s_copy;
public:
CopyConstructor (const char *str)
{
s_copy = new char[16]; //Dynamic memory alocation
strcpy(s_copy, str);
}
CopyConstructor (const CopyConstructor &str)
{
s_copy = new char[16]; //Dynamic memory alocation
strcpy(s_copy, str.s_copy);
}
void concatenate(const char *str)
{
strcat(s_copy, str); //Concatenating two strings
}
~CopyConstructor()
{
delete [] s_copy;
}
void display()
{
cout<<s_copy<<endl;
}
};
/* main function */
int main()
{
CopyConstructor c1("Copy");
CopyConstructor c2 = c1; //copy constructor
c1.display();
c2.display();
c1.concatenate("Constructor"); //c1 is invoking concatenate()
c1.display();
c2.display();
return 0;
}
3. Hàm hủy
Cú pháp: ~[Tên class]
Hàm hủy không có tham số truyền vào.
Ví dụ:
class A
{
public:
// defining destructor for class
~A()
{
// statement
}
};
Ví dụ
class A
{
// constructor
A()
{
cout << "Constructor called";
}
// destructor
~A()
{
cout << "Destructor called";
}
};
int main()
{
A obj1; // Constructor Called
int x = 1
if(x)
{
A obj2; // Constructor Called
} // Destructor Called for obj2
} // Destructor called for obj1
Vi du 2:
class Dual
{
public:
int a;
Dual(int x=0)
{
a = x;
}
};
int main()
{
Dual obj1;
Dual obj2(10);
}
Thứ Bảy, 30 tháng 3, 2019
[Học C++] Bài5- Định nghĩa và tạo đối tượng Class trong C++
1. Tạo đối tượng cho class
Ví dụ:
class Student
{
public:
int id;
string name;
};
Có 2 cách để tạo đối tượng của class: 2 cách này có ý nghĩa như nhau.
- Cách 1:
class Student
{
public:
int id;
string name;
}A,B;
A,B là 2 đối tượng của class Student
- Cách 2:
int main()
{
// tên class tên_Object
Student A;
Student B;
}
2. Truy cập vào class
2.1 Phương thức Public
class Student
{
public:
int rollno;
string name;
};
int main()
{
Student A;
Student B;
// setting values for A object
A.rollno=1;
A.name="Adam";
// setting values for B object
B.rollno=2;
B.name="Bella";
cout <<"Name and Roll no of A is: "<< A.name << "-" << A.rollno;
cout <<"Name and Roll no of B is: "<< B.name << "-" << B.rollno;
}
OUTPUT
Name and Roll no of A is: Adam-1
Name and Roll no of B is: Bella-2
2.1 Private
class Student
{
private: // private data member
int rollno;
public:
// public function to get value of rollno - getter
int getRollno()
{
return rollno;
}
// public function to set value for rollno - setter
void setRollno(int i)
{
rollno=i;
}
};
int main()
{
Student A;
A.rollono=1; //Compile time error
cout<< A.rollno; //Compile time error
A.setRollno(1); //Rollno initialized to 1
cout<< A.getRollno(); //Output will be 1
}
3. Hàm thành viên của Class
Hàm thành viên được định nghĩa trong class... Đê định nghĩa ta có 2 cách: Trong và ngoài class.
class COGE {
public:
int year_old;
//khai bao ham thanh vien
int getYearOld();
};
- Cách 1: Định nghĩa hàm thành viên trong class
class COGE {
public:
int year_old;
//khai bao ham thanh vien
int getYearOld() {
return year_old+8;
}
};
- Cách 2: Định nghĩa ngoài class
Ta phải sử dụng toán tử phạm vi ::
class COGE {
public:
int year_old;
//khai bao ham thanh vien
int getYearOld();
};
int COGE::getYearOld() {
return year_old;
}
4. gọi thành viên trong class
Để gọi 1 thành viên trong class ta dùng dấu chấm '.'
#include "stdafx.h"
#include <iostream>
using namespace std;
class COGE {
public:
int year_old;
//khai bao ham thanh vien
int getYearOld();
};
int COGE::getYearOld() {
return year_old;
}
int _tmain(int argc, _TCHAR* argv[])
{
COGE Neb;
Neb.year_old = 8;
Neb.getYearOld();
system("pause");
return 0;
}
Author: Cong Neb
Alias: Dark Neb
Studied at: SET BKHN K57
Nếu copy tài liệu: Nhớ ghi nguồn tác giả..Tks
Ví dụ:
class Student
{
public:
int id;
string name;
};
Có 2 cách để tạo đối tượng của class: 2 cách này có ý nghĩa như nhau.
- Cách 1:
class Student
{
public:
int id;
string name;
}A,B;
A,B là 2 đối tượng của class Student
- Cách 2:
int main()
{
// tên class tên_Object
Student A;
Student B;
}
2. Truy cập vào class
2.1 Phương thức Public
class Student
{
public:
int rollno;
string name;
};
int main()
{
Student A;
Student B;
// setting values for A object
A.rollno=1;
A.name="Adam";
// setting values for B object
B.rollno=2;
B.name="Bella";
cout <<"Name and Roll no of A is: "<< A.name << "-" << A.rollno;
cout <<"Name and Roll no of B is: "<< B.name << "-" << B.rollno;
}
OUTPUT
Name and Roll no of A is: Adam-1
Name and Roll no of B is: Bella-2
2.1 Private
class Student
{
private: // private data member
int rollno;
public:
// public function to get value of rollno - getter
int getRollno()
{
return rollno;
}
// public function to set value for rollno - setter
void setRollno(int i)
{
rollno=i;
}
};
int main()
{
Student A;
A.rollono=1; //Compile time error
cout<< A.rollno; //Compile time error
A.setRollno(1); //Rollno initialized to 1
cout<< A.getRollno(); //Output will be 1
}
3. Hàm thành viên của Class
Hàm thành viên được định nghĩa trong class... Đê định nghĩa ta có 2 cách: Trong và ngoài class.
class COGE {
public:
int year_old;
//khai bao ham thanh vien
int getYearOld();
};
- Cách 1: Định nghĩa hàm thành viên trong class
class COGE {
public:
int year_old;
//khai bao ham thanh vien
int getYearOld() {
return year_old+8;
}
};
- Cách 2: Định nghĩa ngoài class
Ta phải sử dụng toán tử phạm vi ::
class COGE {
public:
int year_old;
//khai bao ham thanh vien
int getYearOld();
};
int COGE::getYearOld() {
return year_old;
}
4. gọi thành viên trong class
Để gọi 1 thành viên trong class ta dùng dấu chấm '.'
#include "stdafx.h"
#include <iostream>
using namespace std;
class COGE {
public:
int year_old;
//khai bao ham thanh vien
int getYearOld();
};
int COGE::getYearOld() {
return year_old;
}
int _tmain(int argc, _TCHAR* argv[])
{
COGE Neb;
Neb.year_old = 8;
Neb.getYearOld();
system("pause");
return 0;
}
Author: Cong Neb
Alias: Dark Neb
Studied at: SET BKHN K57
Nếu copy tài liệu: Nhớ ghi nguồn tác giả..Tks
[Học C++] Bài4- Giới thiệu class trong C++
1. Giới thiệu
Class là đặc tính rất quan trọng của C++ cái thể hiện rõ hướng đối tượng..
Nó định nghĩa kiểu dữ liệu người dùng,class sẽ quản lý các thành viên và các hàm thành viên.
2. Coding Rule
- Tên class nên bắt đầu bằng chữ in hoa (Mặc dù không bắt buộc)
ví dụ: class Neb,class Coge... etc
- Các hàm thành viên của class có thể được định nghĩa bên trong hoặc bên ngoài class.
- Class ở C++ tương đương như Struct trong C,chỉ khác rằng class cung cấp 1 phương thức
private,còn với struct tất cả thành viên đều là public.
3. Đối tượng của class
Giống struct,ta cần tạo đối tượng để tương tác với class..
Một đối tượng là thể hiện của class đó,nó sẽ giữ giá trị biến được định nghĩa bên trong class
và cả các hàm thành viên nữa.
Các đối tượng được khởi tạo bằng 1 hàm đặc biệt được gọi là Constructor (Hàm tạo)
Và bất kì khi nào đối tượng ra khỏi phạm vi,thì một hàm đặc biệt khác được gọi: Destructor (Hàm hủy)
. Hàm hủy để giải phóng vùng nhớ của đối tượng được tạo ra trước đó.
Ví dụ:
class Abc
{
int x;
void display()
{
// Khởi tạo gì đó
}
};
int main()
{
Abc obj; // đối tượng của class Abc được tạo
}
4. Truy cập class
Có 3 phương thức để truy cập vào 1 class
- public
- private
- protected
4.1 Public
Có nghĩa rằng chung ta có thể truy cập vào tất cả các thành viên của class được định nghĩa public.
Dữ liệu của các thành viên và các hàm thành viên cũng được truy cập ở class khác được.
Ví dụ:
class PublicAccess
{
// public access modifier
public:
int x; // Data Member
void display(); // Member Function
}
4.2 Private
Khác public,các đối tượng bên ngoài class không thể truy nhập vào các thành viên của class ,mà chỉ các đối tượng bên
trong class đó mới được phép.
Nếu một ai đó cố tình truy nhập vào thành viên private thì compiler sẽ báo lỗi.
Mặc định trong class khi ta không khai báo kiểu truy nhập thì luôn là private.
class PrivateAccess
{
// private access
private:
int x; // Data Member
void display(); // Member Function
}
4.3 Protected
Giống với private,các thành viên trong class không thể truy cập bên ngoài class.Nhưng có thể truy cập bởi các class con.
class ProtectedAccess
{
// protected access
protected:
int x; // Data Member
void display(); // Member Function
}
Author: Cong Neb
Alias: Dark Neb
Studied at: SET BKHN K57
Nếu copy tài liệu: Nhớ ghi nguồn tác giả..Tks
Class là đặc tính rất quan trọng của C++ cái thể hiện rõ hướng đối tượng..
Nó định nghĩa kiểu dữ liệu người dùng,class sẽ quản lý các thành viên và các hàm thành viên.
2. Coding Rule
- Tên class nên bắt đầu bằng chữ in hoa (Mặc dù không bắt buộc)
ví dụ: class Neb,class Coge... etc
- Các hàm thành viên của class có thể được định nghĩa bên trong hoặc bên ngoài class.
- Class ở C++ tương đương như Struct trong C,chỉ khác rằng class cung cấp 1 phương thức
private,còn với struct tất cả thành viên đều là public.
3. Đối tượng của class
Giống struct,ta cần tạo đối tượng để tương tác với class..
Một đối tượng là thể hiện của class đó,nó sẽ giữ giá trị biến được định nghĩa bên trong class
và cả các hàm thành viên nữa.
Các đối tượng được khởi tạo bằng 1 hàm đặc biệt được gọi là Constructor (Hàm tạo)
Và bất kì khi nào đối tượng ra khỏi phạm vi,thì một hàm đặc biệt khác được gọi: Destructor (Hàm hủy)
. Hàm hủy để giải phóng vùng nhớ của đối tượng được tạo ra trước đó.
Ví dụ:
class Abc
{
int x;
void display()
{
// Khởi tạo gì đó
}
};
int main()
{
Abc obj; // đối tượng của class Abc được tạo
}
4. Truy cập class
Có 3 phương thức để truy cập vào 1 class
- public
- private
- protected
4.1 Public
Có nghĩa rằng chung ta có thể truy cập vào tất cả các thành viên của class được định nghĩa public.
Dữ liệu của các thành viên và các hàm thành viên cũng được truy cập ở class khác được.
Ví dụ:
class PublicAccess
{
// public access modifier
public:
int x; // Data Member
void display(); // Member Function
}
4.2 Private
Khác public,các đối tượng bên ngoài class không thể truy nhập vào các thành viên của class ,mà chỉ các đối tượng bên
trong class đó mới được phép.
Nếu một ai đó cố tình truy nhập vào thành viên private thì compiler sẽ báo lỗi.
Mặc định trong class khi ta không khai báo kiểu truy nhập thì luôn là private.
class PrivateAccess
{
// private access
private:
int x; // Data Member
void display(); // Member Function
}
4.3 Protected
Giống với private,các thành viên trong class không thể truy cập bên ngoài class.Nhưng có thể truy cập bởi các class con.
class ProtectedAccess
{
// protected access
protected:
int x; // Data Member
void display(); // Member Function
}
Author: Cong Neb
Alias: Dark Neb
Studied at: SET BKHN K57
Nếu copy tài liệu: Nhớ ghi nguồn tác giả..Tks
[Học C++] Bài3- Biến trong C++
1. Biến Static
Biến static là biến được khởi tạo và cấp phát bộ nhớ chỉ một lần tại thời điểm bắt đầu chương trình.
Biến static sẽ giữ lại giá trị đến khi chương trình dừng hoạt động...
Ví dụ
#include "stdafx.h"
#include <iostream>
using namespace std;
void static_fun();
int _tmain(int argc, _TCHAR* argv[])
{
static_fun();//in ra 11
static_fun();//in ra 12
system("pause");
return 0;
}
void static_fun() {
static int a = 10;
a++;
cout<<a;
}
Ví dụ 2: Không dùng biến static
Author: Cong Neb
Alias: Dark Neb
Studied at: SET BKHN K57
Nếu copy tài liệu: Nhớ ghi nguồn tác giả..Tks
Biến static là biến được khởi tạo và cấp phát bộ nhớ chỉ một lần tại thời điểm bắt đầu chương trình.
Biến static sẽ giữ lại giá trị đến khi chương trình dừng hoạt động...
Ví dụ
#include "stdafx.h"
#include <iostream>
using namespace std;
void static_fun();
int _tmain(int argc, _TCHAR* argv[])
{
static_fun();//in ra 11
static_fun();//in ra 12
system("pause");
return 0;
}
void static_fun() {
static int a = 10;
a++;
cout<<a;
}
Ví dụ 2: Không dùng biến static
int _tmain(int argc, _TCHAR* argv[])
{
static_fun();//in ra 11
static_fun();//in ra 11 .. Không tăng lên sau các gần gọi hàm tiếp theo
system("pause");
return 0;
}
{
static_fun();//in ra 11
static_fun();//in ra 11 .. Không tăng lên sau các gần gọi hàm tiếp theo
system("pause");
return 0;
}
void static_fun() {
int a = 10;
a++;
cout<<a;
}
int a = 10;
a++;
cout<<a;
}
Author: Cong Neb
Alias: Dark Neb
Studied at: SET BKHN K57
Nếu copy tài liệu: Nhớ ghi nguồn tác giả..Tks
[Học C++] Bài2 - Hàm trong C++
Hàm giúp cho chương trình dễ hiểu,rõ ràng và dễ check errors
1. Cú phám cơ bản
[kiểu trả về] [tên hàm] (tham số 1,tham số 2,...)
{
// thân hàm
}
- Kiểu trả về: Kiểu dữ liệu mà hàm trả về.. Nó có thể là int,char,con trỏ hay class..
Và nếu hàm không trả về giá trị,bạn nên dùng kiểu trả về là void.
- Tên hàm: Tên hàm (Chú ý không đặt trùng với từ khóa)..
- Tham số : Là các biến giữ giá trị khi hàm được gọi.Một hàm có thể có hoặc không có
tham số... Khi gọi hàm,hàm có bao nhiêu tham số thì lúc gọi hàm ta phải truyền vào bấy
nhiêu tham số... ví dụ dưới: hàm sum có 2 tham số x,y...trong hàm main() khi gọi hàm sum()
ta cũng phải truyền vào 2 biến..
Ví dụ: Hàm tính tổng 2 số
// hàm sum có 2 tham số đầu vào x,y
void sum(int x, int y)
{
int z;
z = x + y;
cout << z;
}
int main()
{
int a = 10;
int b = 20;
//gọi hàm sum ở trên,và truyền vào 2 đối số a,b
sum (a, b);
}
2. Định nghĩa hàm
Hãy nhớ rằng Compiler thực thi chương trình trong hàm main() trước... Sau đó.nếu trong
hàm main() có gọi đến 1 hàm nào đó bạn tự khai báo.
Với các project nhỏ thì ta viết luôn hàm tự khởi tạo ở phía trên hàm main(),nhưng với các
chương trình lớn mà ta cần include rất nhiều các file như .h,.c thì không khả thi và sẽ sinh lỗi
... Vì khi hàm main() chạy thì hàm tự khởi tạo của chúng ta chưa hề được định nghĩa trước đó.
Mặc dù khi Compile chương trinhg vẫn OK,không lỗi :D
Để khắc phục: Người ta dùng phương pháp "Lời gọi hàm"
ví dụ với hàm sum() ở trên:
#include <iostream>
using namespace std;
int sum(int x,int y); //copy y nguyên hàm sum() thôi
void main ()
{
int a,b = 1;
int sum_val = sum(a,b);
}
// ham sum khai báo sau hàm main()
int sum (int x,int y) {
int sum = x + y;
return sum;
}
3. Gọi hàm
Hàm được gọi bởi tên hàm... Nếu hàm không có tham số,nó có thể được gọi trực tiếp thông qua tên hàm.
Với những hàm có tham số,chúng ta có 2 cách gọi:
- gọi bởi tham trị
- gọi bởi tham chiếu
3.1 Gọi hàm bằng tham trị
Là kĩ thuật gọi hàm,chúng ta truyền vào giá trị cho đối số cái sẽ được lưu trữ hoặc copy trong hàm.. Khi ra khỏi hàm giá trị đó không có tác dụng nữa.
Do đó,giá trị ban đầu KHÔNG THAY ĐỔI...
void calc(int x);
int main()
{
int x = 10;
calc(x);
printf("%d", x); //in ra 10
}
int calc(int x)
{
x = x + 10 ;
return x;
}
Giải thích:
Giá trị thực của biến x không thay đổi,bởi vì ta truyền vào giá trị,do đó 1 biến copy của x sẽ được truyền vào.
Biến copy này sẽ bị hủy sau khi ra khỏi hàm calc().
* Cach 2:
int calc(int x);
int main()
{
int x = 10;
x = calc(x);
printf("%d", x); //in ra 20-ok
}
int calc(int x)
{
x = x + 10 ;
return x;
}
3.2 Gọi hàm bằng tham chiếu
Khi muốn thay đổi giá trị của biến sau khi gọi hàm...
Ta truyền vào địa chỉ của biến,trong phương pháp này tham số chính thức có thể được thực hiện
như là tham chiếu hay con trỏ,cả 2 phương pháp đều giúp thay đổi giá trị biến ban đầu.
void calc(int *p);
int main()
{
int x = 10;
calc(&x); // truyền địa chỉ của x,như 1 đối số
printf("%d", x);
}
void calc(int *p)
{
*p = *p + 10;
}
Author: Cong Neb
Alias: Dark Neb
Studied at: SET BKHN K57
Nếu copy tài liệu: Nhớ ghi nguồn tác giả..Tks
1. Cú phám cơ bản
[kiểu trả về] [tên hàm] (tham số 1,tham số 2,...)
{
// thân hàm
}
- Kiểu trả về: Kiểu dữ liệu mà hàm trả về.. Nó có thể là int,char,con trỏ hay class..
Và nếu hàm không trả về giá trị,bạn nên dùng kiểu trả về là void.
- Tên hàm: Tên hàm (Chú ý không đặt trùng với từ khóa)..
- Tham số : Là các biến giữ giá trị khi hàm được gọi.Một hàm có thể có hoặc không có
tham số... Khi gọi hàm,hàm có bao nhiêu tham số thì lúc gọi hàm ta phải truyền vào bấy
nhiêu tham số... ví dụ dưới: hàm sum có 2 tham số x,y...trong hàm main() khi gọi hàm sum()
ta cũng phải truyền vào 2 biến..
Ví dụ: Hàm tính tổng 2 số
// hàm sum có 2 tham số đầu vào x,y
void sum(int x, int y)
{
int z;
z = x + y;
cout << z;
}
int main()
{
int a = 10;
int b = 20;
//gọi hàm sum ở trên,và truyền vào 2 đối số a,b
sum (a, b);
}
2. Định nghĩa hàm
Hãy nhớ rằng Compiler thực thi chương trình trong hàm main() trước... Sau đó.nếu trong
hàm main() có gọi đến 1 hàm nào đó bạn tự khai báo.
Với các project nhỏ thì ta viết luôn hàm tự khởi tạo ở phía trên hàm main(),nhưng với các
chương trình lớn mà ta cần include rất nhiều các file như .h,.c thì không khả thi và sẽ sinh lỗi
... Vì khi hàm main() chạy thì hàm tự khởi tạo của chúng ta chưa hề được định nghĩa trước đó.
Mặc dù khi Compile chương trinhg vẫn OK,không lỗi :D
Để khắc phục: Người ta dùng phương pháp "Lời gọi hàm"
ví dụ với hàm sum() ở trên:
#include <iostream>
using namespace std;
int sum(int x,int y); //copy y nguyên hàm sum() thôi
void main ()
{
int a,b = 1;
int sum_val = sum(a,b);
}
// ham sum khai báo sau hàm main()
int sum (int x,int y) {
int sum = x + y;
return sum;
}
3. Gọi hàm
Hàm được gọi bởi tên hàm... Nếu hàm không có tham số,nó có thể được gọi trực tiếp thông qua tên hàm.
Với những hàm có tham số,chúng ta có 2 cách gọi:
- gọi bởi tham trị
- gọi bởi tham chiếu
3.1 Gọi hàm bằng tham trị
Là kĩ thuật gọi hàm,chúng ta truyền vào giá trị cho đối số cái sẽ được lưu trữ hoặc copy trong hàm.. Khi ra khỏi hàm giá trị đó không có tác dụng nữa.
Do đó,giá trị ban đầu KHÔNG THAY ĐỔI...
void calc(int x);
int main()
{
int x = 10;
calc(x);
printf("%d", x); //in ra 10
}
int calc(int x)
{
x = x + 10 ;
return x;
}
Giải thích:
Giá trị thực của biến x không thay đổi,bởi vì ta truyền vào giá trị,do đó 1 biến copy của x sẽ được truyền vào.
Biến copy này sẽ bị hủy sau khi ra khỏi hàm calc().
* Cach 2:
int calc(int x);
int main()
{
int x = 10;
x = calc(x);
printf("%d", x); //in ra 20-ok
}
int calc(int x)
{
x = x + 10 ;
return x;
}
3.2 Gọi hàm bằng tham chiếu
Khi muốn thay đổi giá trị của biến sau khi gọi hàm...
Ta truyền vào địa chỉ của biến,trong phương pháp này tham số chính thức có thể được thực hiện
như là tham chiếu hay con trỏ,cả 2 phương pháp đều giúp thay đổi giá trị biến ban đầu.
void calc(int *p);
int main()
{
int x = 10;
calc(&x); // truyền địa chỉ của x,như 1 đối số
printf("%d", x);
}
void calc(int *p)
{
*p = *p + 10;
}
Author: Cong Neb
Alias: Dark Neb
Studied at: SET BKHN K57
Nếu copy tài liệu: Nhớ ghi nguồn tác giả..Tks
[Học C++] Bài 1 - sizeof và typedef trong C++
1... sizeof
sizeof là 1 Operator,được sử dụng để lấy thông tin về tổng bộ nhớ được cấp phát cho
kiểu dữ liệu hoặc đối tượng...
Ví dụ:
cout<<sizeof(double); //in ra size của kiểu double
//Nếu sử dụng cho biến thì ta không cần ngoặc đơn
int x = 1;
int i = sizeof x;
cout<<i; //in ra 4
2... typedef
Là keyword trong C,dùng để thay thế một loại dữ liệu đã tồn tại...
Ví dụ: Tạo một kiểu dữ liệu mới có tên neb từ kiểu int.
typedef int neb;
neb i = 8;
cout<<sizeof(int); //4
cout<<sizeof(neb); //4
2.1 typedef và Pointer
Tương tự thì typedef có thể sử dụng để tạo 1 biệt danh(alias) cho pointers...
Ví dụ:
typedef int* neb_Ptr;
neb_Ptr a;
cout<<sizeof(int*);
cout<<sizeof(neb_Ptr);
// khai bao 1 pointer,..cho vao 1 bien
int var = 1;
neb_Ptr prt = &var;
Author: Cong Neb
Alias: Dark Neb
Studied at: SET BKHN K57
Nếu copy tài liệu: Nhớ ghi nguồn tác giả..Tks
sizeof là 1 Operator,được sử dụng để lấy thông tin về tổng bộ nhớ được cấp phát cho
kiểu dữ liệu hoặc đối tượng...
Ví dụ:
cout<<sizeof(double); //in ra size của kiểu double
//Nếu sử dụng cho biến thì ta không cần ngoặc đơn
int x = 1;
int i = sizeof x;
cout<<i; //in ra 4
2... typedef
Là keyword trong C,dùng để thay thế một loại dữ liệu đã tồn tại...
Ví dụ: Tạo một kiểu dữ liệu mới có tên neb từ kiểu int.
typedef int neb;
neb i = 8;
cout<<sizeof(int); //4
cout<<sizeof(neb); //4
2.1 typedef và Pointer
Tương tự thì typedef có thể sử dụng để tạo 1 biệt danh(alias) cho pointers...
Ví dụ:
typedef int* neb_Ptr;
neb_Ptr a;
cout<<sizeof(int*);
cout<<sizeof(neb_Ptr);
// khai bao 1 pointer,..cho vao 1 bien
int var = 1;
neb_Ptr prt = &var;
Author: Cong Neb
Alias: Dark Neb
Studied at: SET BKHN K57
Nếu copy tài liệu: Nhớ ghi nguồn tác giả..Tks
Chủ Nhật, 17 tháng 6, 2018
[Guide fo C] Types of Function calls in C
Functions are called by their names, we all know that, then what is this tutorial for? Well if the function does not have any arguments, then to call a function you can directly use its name. But for functions with arguments, we can call a function in two different ways, based on how we specify the arguments, and these two ways are:
- Call by Value
- Call by Reference
- Call by Value
Calling a function by value means, we pass the values of the arguments which are stored or copied into the formal parameters of the function. Hence, the original values are unchanged only the parameters inside the function changes.
Call by Reference
In call by reference we pass the address(reference) of a variable as argument to any function. When we pass the address of any variable as argument, then the function will have access to our variable, as it now knows where it is stored and hence can easily update its value.
In this case the formal parameter can be taken as a reference or a pointer(don't worry about pointers, we will soon learn about them), in both the cases they will change the values of the original variable.
NOTE: If you do not have any prior knowledge of pointers, do study Pointers first. Or just go over this topic and come back again to revise this, once you have learned about pointers.
- Call by Value
- Call by Reference
- Call by Value
Calling a function by value means, we pass the values of the arguments which are stored or copied into the formal parameters of the function. Hence, the original values are unchanged only the parameters inside the function changes.
#include<stdio.h>

void calc(int x);

int main()
{
    int x = 10;
    calc(x);
    // this will print the value of 'x'
    printf("\nvalue of x in main is %d", x);
    return 0;
}

void calc(int x)
{
    // changing the value of 'x'
    x = x + 10 ;
    printf("value of x in calc function is %d ", x);
}
value of x in main is 10
In this case, the actual variable x is not changed. This is because we are passing the argument by value, hence a copy of x is passed to the function, which is updated during function execution, and that copied value in the function is destroyed when the function ends(goes out of scope). So the variable x inside the main() function is never changed and hence, still holds a value of 10.
But we can change this program to let the function modify the original x variable, by making the function calc() return a value, and storing that value in x.
In this case, the actual variable x is not changed. This is because we are passing the argument by value, hence a copy of x is passed to the function, which is updated during function execution, and that copied value in the function is destroyed when the function ends(goes out of scope). So the variable x inside the main() function is never changed and hence, still holds a value of 10.
But we can change this program to let the function modify the original x variable, by making the function calc() return a value, and storing that value in x.
#include<stdio.h>

int calc(int x);

int main()
{
    int x = 10;
    x = calc(x);
    printf("value of x is %d", x);
    return 0;
}

int calc(int x)
{
    x = x + 10 ;
    return x;
}Call by Reference
In call by reference we pass the address(reference) of a variable as argument to any function. When we pass the address of any variable as argument, then the function will have access to our variable, as it now knows where it is stored and hence can easily update its value.
In this case the formal parameter can be taken as a reference or a pointer(don't worry about pointers, we will soon learn about them), in both the cases they will change the values of the original variable.
#include<stdio.h>

void calc(int *p);      // functin taking pointer as argument

int main()
{
    int x = 10;
    calc(&x);       // passing address of 'x' as argument
    printf("value of x is %d", x);
    return(0);
}

void calc(int *p)       //receiving the address in a reference pointer variable
{
    /*
        changing the value directly that is
        stored at the address passed
    */
    *p = *p + 10;
}NOTE: If you do not have any prior knowledge of pointers, do study Pointers first. Or just go over this topic and come back again to revise this, once you have learned about pointers.
[Guide for C] Error Handling in C
C language does not provide any direct support for error handling. However a few methods and variables defined in error.h header file can be used to point out error using the return statement in a function. In C language, a function returns -1 or NULL value in case of any error and a global variable errno is set with the error code. So the return value can be used to check error while programming.
What is errno?
Whenever a function call is made in C language, a variable named errno is associated with it. It is a global variable, which can be used to identify which type of error was encountered while function execution, based on its value. Below we have the list of Error numbers and what does they mean.
C language uses the following functions to represent error messages associated with errno:
perror(): returns the string passed to it along with the textual represention of the current errno value.
strerror() is defined in string.h library. This method returns a pointer to the string representation of the current errno value.
Time for an Example
Here exit function is used to indicate exit status. Its always a good practice to exit a program with a exit status. EXIT_SUCCESS and EXIT_FAILURE are two macro used to show exit status. In case of program coming out after a successful operation EXIT_SUCCESS is used to show successful exit. It is defined as 0. EXIT_Failure is used in case of any failure in the program. It is defined as -1.
Division by Zero
There are some situation where nothing can be done to handle the error. In C language one such situation is division by zero. All you can do is avoid doing this, becasue if you do so, C language is not able to understand what happened, and gives a runtime error.
Best way to avoid this is, to check the value of the divisor before using it in the division operations. You can use if condition, and if it is found to be zero, just display a message and return from the function.
What is errno?
Whenever a function call is made in C language, a variable named errno is associated with it. It is a global variable, which can be used to identify which type of error was encountered while function execution, based on its value. Below we have the list of Error numbers and what does they mean.
| errno value | Error |
|---|---|
| 1 | Operation not permitted |
| 2 | No such file or directory |
| 3 | No such process |
| 4 | Interrupted system call |
| 5 | I/O error |
| 6 | No such device or address |
| 7 | Argument list too long |
| 8 | Exec format error |
| 9 | Bad file number |
| 10 | No child processes |
| 11 | Try again |
| 12 | Out of memory |
| 13 | Permission denied |
C language uses the following functions to represent error messages associated with errno:
perror(): returns the string passed to it along with the textual represention of the current errno value.
strerror() is defined in string.h library. This method returns a pointer to the string representation of the current errno value.
Time for an Example
#include <stdio.h>
#include <errno.h>
#include <string.h>

int main ()
{
    FILE *fp;

    /*
        If a file, which does not exists, is opened,
        we will get an error
    */
    fp = fopen("IWillReturnError.txt", "r");

    printf("Value of errno: %d\n ", errno);
    printf("The error message is : %s\n", strerror(errno));
    perror("Message from perror");

    return 0;
}
The error message is: No such file or directory
Message from perror: No such file or directory
Other ways of Error Handling
We can also use Exit Status constants in the exit() function to inform the calling function about the error. The two constant values available for use are EXIT_SUCCESS and EXIT_FAILURE. These are nothing but macros defined stdlib.h header file.
Other ways of Error Handling
We can also use Exit Status constants in the exit() function to inform the calling function about the error. The two constant values available for use are EXIT_SUCCESS and EXIT_FAILURE. These are nothing but macros defined stdlib.h header file.
#include <stdio.h>
#include <errno.h>
#include <stdlib.h>
#include <string.h>

extern int errno;

void main()
{
    char *ptr = malloc( 1000000000UL);  //requesting to allocate 1gb memory space
    if (ptr == NULL)    //if memory not available, it will return null
    {
        puts("malloc failed");
        puts(strerror(errno));
        exit(EXIT_FAILURE);     //exit status failure
    }
    else
    {
        free( ptr);
        exit(EXIT_SUCCESS);     //exit status Success
    }
}
Here exit function is used to indicate exit status. Its always a good practice to exit a program with a exit status. EXIT_SUCCESS and EXIT_FAILURE are two macro used to show exit status. In case of program coming out after a successful operation EXIT_SUCCESS is used to show successful exit. It is defined as 0. EXIT_Failure is used in case of any failure in the program. It is defined as -1.
Division by Zero
There are some situation where nothing can be done to handle the error. In C language one such situation is division by zero. All you can do is avoid doing this, becasue if you do so, C language is not able to understand what happened, and gives a runtime error.
Best way to avoid this is, to check the value of the divisor before using it in the division operations. You can use if condition, and if it is found to be zero, just display a message and return from the function.
[Guide for C] Type of User-defined Functions in C
There can be 4 different types of user-defined functions, they are:
- Function with no arguments and no return value
- Function with no arguments and a return value
- Function with arguments and no return value
- Function with arguments and a return value
Below, we will discuss about all these types, along with program examples.
Function with no arguments and no return value
Such functions can either be used to display information or they are completely dependent on user inputs.
Below is an example of a function, which takes 2 numbers as input from user, and display which is the greater number.
Function with no arguments and a return value
We have modified the above example to make the function greatNum() return the number which is greater amongst the 2 input numbers.
- Function with no arguments and no return value
- Function with no arguments and a return value
- Function with arguments and no return value
- Function with arguments and a return value
Below, we will discuss about all these types, along with program examples.
Function with no arguments and no return value
Such functions can either be used to display information or they are completely dependent on user inputs.
Below is an example of a function, which takes 2 numbers as input from user, and display which is the greater number.
#include<stdio.h>

void greatNum();       // function declaration

int main()
{
    greatNum();        // function call
    return 0;
}

void greatNum()        // function definition
{
    int i, j;
    printf("Enter 2 numbers that you want to compare...");
    scanf("%d%d", &i, &j);
    if(i > j) {
        printf("The greater number is: %d", i);
    }
    else {
        printf("The greater number is: %d", j);
    }
}
Function with no arguments and a return value
We have modified the above example to make the function greatNum() return the number which is greater amongst the 2 input numbers.
#include<stdio.h>

int greatNum();       // function declaration

int main()
{
    int result;
    result = greatNum();        // function call
    printf("The greater number is: %d", result);
    return 0;
}

int greatNum()        // function definition
{
    int i, j, greaterNum;
    printf("Enter 2 numbers that you want to compare...");
    scanf("%d%d", &i, &j);
    if(i > j) {
        greaterNum = i;
    }
    else {
        greaterNum = j;
    }
    // returning the result
    return greaterNum;
}[Guide for C] Introduction to Structure
Structure is a user-defined datatype in C language which allows us to combine data of different types together. Structure helps to construct a complex data type which is more meaningful. It is somewhat similar to an Array, but an array holds data of similar type only. But structure on the other hand, can store data of any type, which is practical more useful.
For example: If I have to write a program to store Student information, which will have Student's name, age, branch, permanent address, father's name etc, which included string values, integer values etc, how can I use arrays for this problem, I will require something which can hold data of different types together.
In structure, data is stored in form of records.
Defining a structure
struct keyword is used to define a structure. struct defines a new data type which is a collection of primary and derived datatypes.
Syntax:
As you can see in the syntax above, we start with the struct keyword, then it's optional to provide your structure a name, we suggest you to give it a name, then inside the curly braces, we have to mention all the member variables, which are nothing but normal C language variables of different types like int, float, array etc.
After the closing curly brace, we can specify one or more structure variables, again this is optional.
Note: The closing curly brace in the structure type declaration must be followed by a semicolon(;).
Example of Structure
Here struct Student declares a structure to hold the details of a student which consists of 4 data fields, namely name, age, branch and gender. These fields are called structure elements or members.
Each member can have different datatype, like in this case, name is an array of char type and age is of int type etc. Student is the name of the structure and is called as the structure tag.
Declaring Structure Variables
It is possible to declare variables of a structure, either along with structure definition or after the structure is defined. Structure variable declaration is similar to the declaration of any normal variable of any other datatype. Structure variables can be declared in following two ways:1) Declaring Structure variables separately
2) Declaring Structure variables with structure definition
Accessing Structure Members
Structure members can be accessed and assigned values in a number of ways. Structure members have no meaning individually without the structure. In order to assign a value to any structure member, the member name must be linked with the structure variable using a dot . operator also called period or member access operator.
For example:
Name of Student 1: Viraaj Age of Student 1: 18
We can also use scanf() to give values to structure members through terminal.
Structure Initialization
Like a variable of any other datatype, structure variable can also be initialized at compile time.
Array of Structure
We can also declare an array of structure variables. in which each element of the array will represent a structure variable. Example : struct employee emp[5];
The below program defines an array emp of size 5. Each element of the array emp is of type Employee.
Nested Structures
Nesting of structures, is also permitted in C language. Nested structures means, that one structure has another stucture as member variable.
Example:
Structure as Function Arguments
We can pass a structure as a function argument just like we pass any other variable or an array as a function argument.
Example:
For example: If I have to write a program to store Student information, which will have Student's name, age, branch, permanent address, father's name etc, which included string values, integer values etc, how can I use arrays for this problem, I will require something which can hold data of different types together.
In structure, data is stored in form of records.
Defining a structure
struct keyword is used to define a structure. struct defines a new data type which is a collection of primary and derived datatypes.
Syntax:
struct [structure_tag]
{
    //member variable 1
    //member variable 2
    //member variable 3
    ...
}[structure_variables];
As you can see in the syntax above, we start with the struct keyword, then it's optional to provide your structure a name, we suggest you to give it a name, then inside the curly braces, we have to mention all the member variables, which are nothing but normal C language variables of different types like int, float, array etc.
After the closing curly brace, we can specify one or more structure variables, again this is optional.
Note: The closing curly brace in the structure type declaration must be followed by a semicolon(;).
Example of Structure
struct Student
{
    char name[25];
    int age;
    char branch[10];
    // F for female and M for male
    char gender;
};Each member can have different datatype, like in this case, name is an array of char type and age is of int type etc. Student is the name of the structure and is called as the structure tag.
Declaring Structure Variables
It is possible to declare variables of a structure, either along with structure definition or after the structure is defined. Structure variable declaration is similar to the declaration of any normal variable of any other datatype. Structure variables can be declared in following two ways:1) Declaring Structure variables separately
struct Student
{
    char name[25];
    int age;
    char branch[10];
    //F for female and M for male
    char gender;
};

struct Student S1, S2;      //declaring variables of struct Student
2) Declaring Structure variables with structure definition
struct Student
{
    char name[25];
    int age;
    char branch[10];
    //F for female and M for male
    char gender;
}S1, S2;Accessing Structure Members
Structure members can be accessed and assigned values in a number of ways. Structure members have no meaning individually without the structure. In order to assign a value to any structure member, the member name must be linked with the structure variable using a dot . operator also called period or member access operator.
For example:
#include<stdio.h>
#include<string.h>

struct Student
{
    char name[25];
    int age;
    char branch[10];
    //F for female and M for male
    char gender;
};

int main()
{
    struct Student s1;

    /*
        s1 is a variable of Student type and
        age is a member of Student
    */
    s1.age = 18;
    /*
        using string function to add name
    */
    strcpy(s1.name, "Viraaj");
    /*
        displaying the stored values
    */
    printf("Name of Student 1: %s\n", s1.name);
    printf("Age of Student 1: %d\n", s1.age);

    return 0;
}
Name of Student 1: Viraaj Age of Student 1: 18
We can also use scanf() to give values to structure members through terminal.
scanf(" %s ", s1.name);
scanf(" %d ", &s1.age);
Structure Initialization
Like a variable of any other datatype, structure variable can also be initialized at compile time.
struct Patient
{
    float height;
    int weight;
    int age;
};

struct Patient p1 = { 180.75 , 73, 23 }; //initializationstruct Patient p1;
p1.height = 180.75; //initialization of each member separately
p1.weight = 73;
p1.age = 23;Array of Structure
We can also declare an array of structure variables. in which each element of the array will represent a structure variable. Example : struct employee emp[5];
The below program defines an array emp of size 5. Each element of the array emp is of type Employee.
#include<stdio.h>

struct Employee
{
    char ename[10];
    int sal;
};

struct Employee emp[5];
int i, j;
void ask()
{
    for(i = 0; i < 3; i++)
    {
        printf("\nEnter %dst Employee record:\n", i+1);
        printf("\nEmployee name:\t");
        scanf("%s", emp[i].ename);
        printf("\nEnter Salary:\t");
        scanf("%d", &emp[i].sal);
    }
    printf("\nDisplaying Employee record:\n");
    for(i = 0; i < 3; i++)
    {
        printf("\nEmployee name is %s", emp[i].ename);
        printf("\nSlary is %d", emp[i].sal);
    }
}
void main()
{
    ask();
}
Nested Structures
Nesting of structures, is also permitted in C language. Nested structures means, that one structure has another stucture as member variable.
Example:
struct Student
{
    char[30] name;
    int age;
    /* here Address is a structure */
    struct Address
    {
        char[50] locality;
        char[50] city;
        int pincode;
    }addr;
};
Structure as Function Arguments
We can pass a structure as a function argument just like we pass any other variable or an array as a function argument.
Example:
#include<stdio.h>

struct Student
{
    char name[10];
    int roll;
};

void show(struct Student st);

void main()
{
    struct Student std;
    printf("\nEnter Student record:\n");
    printf("\nStudent name:\t");
    scanf("%s", std.name);
    printf("\nEnter Student rollno.:\t");
    scanf("%d", &std.roll);
    show(std);
}

void show(struct Student st)
{
    printf("\nstudent name is %s", st.name);
    printf("\nroll is %d", st.roll);
}
Đăng ký:
Bài đăng (Atom)